How to add an SSL certificate to IIS in Windows Server 2008 R2
Its something I do without really thinking about, just get another certificate and add it to the server so that the website can load with https:// instead of http://I have used lots of different SSL providers, however I have found that the most reliable and easy to use is www.trustico.co.uk and their customer service and support is exceptional.I will try to make this as step-by-step as I possibly can so that it's easy to follow.
Part 1 - Creating the certificate request
1. Open the IIS (Internet Information Services) Manager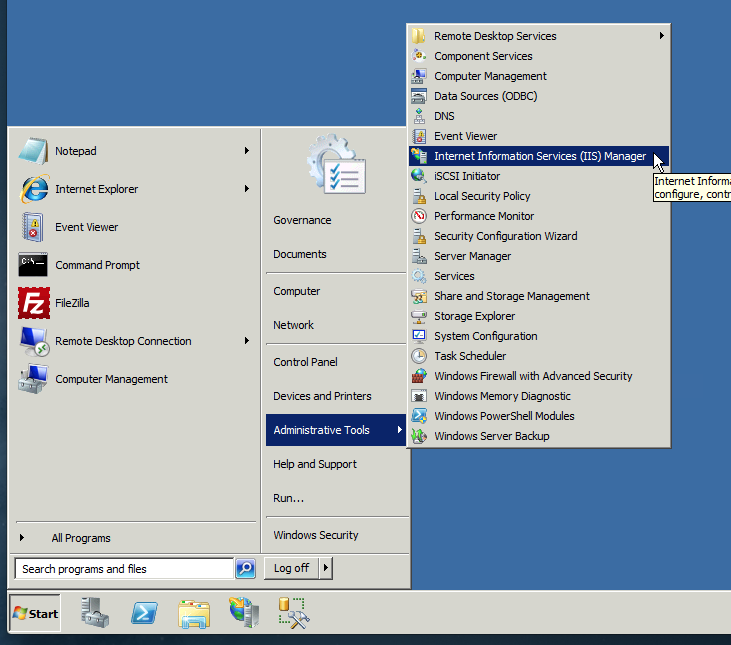 2. Click on the server name on the left hand side and then double-click on Server Certificates
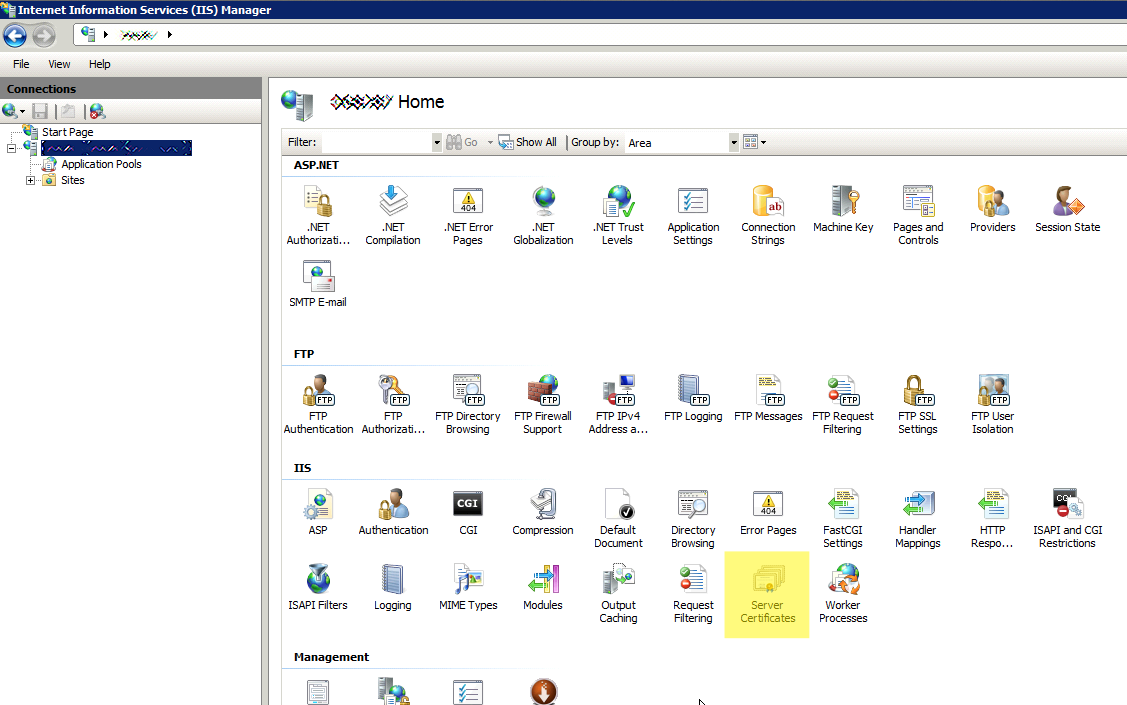 3. On the right-hand-side of the server certificates section, click on Create Certificate Request
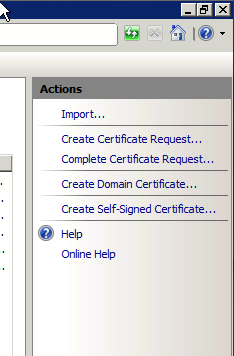 4. The Request Certificate wizard is displayed. The Common Name is the website URL that you are going to make SSL. In this example, I am creating a certificate for one of our systems, Good Morning Pulse.There are two main types of certificate, single and wildcard. A single certificate is for a single site (e.g. https://www.google.co.uk), a wildcard certificate is for multiple sub-domains at the same domain (e.g. https://maps.google.co.uk AND https://places.google.co.uk ... and as many other sub-domains as you can think of) without having to purchase separate certificates for each sub-domain.
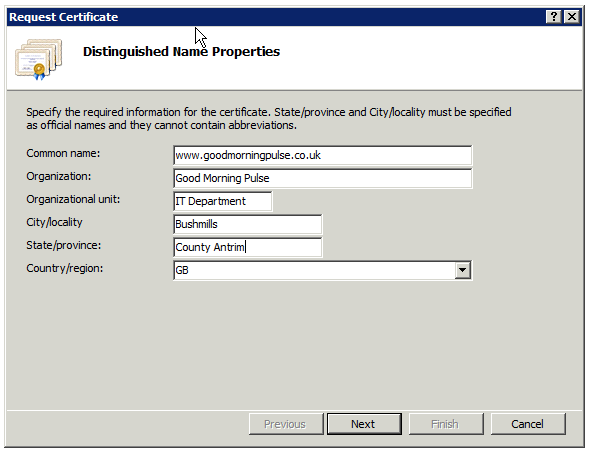 The only REALLY important part of this is the common name.Click on Next to continue 5. Change the Bit length to 2048 or higher. A note of caution on this - if you change it to a really high bit length it means that the volume (size in kb) of all pages being sent to and from your website is significantly increased, but is more secure.You should not choose any setting lower than 2048. As of October 2013, all 1024-bit certificates have been revoked and 2048 is the new standard.
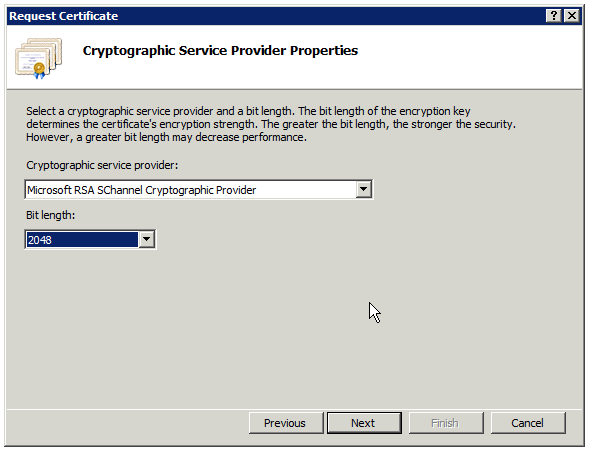 6. Next we are choosing a place to put the certificate request (just a plain text file). I normally put this on the Windows Desktop for ease of accessing in a few steps time.
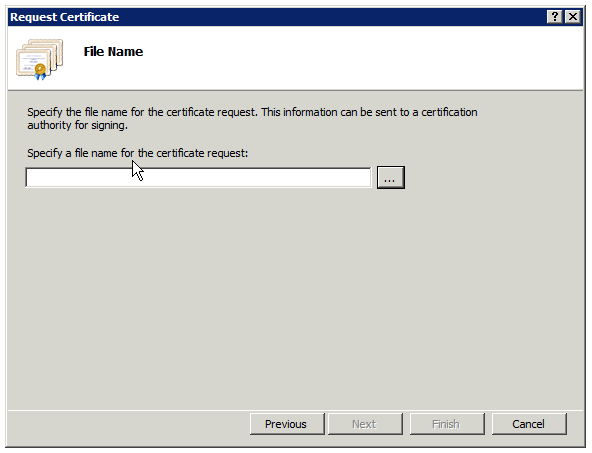 Click on the ... button to choose the location
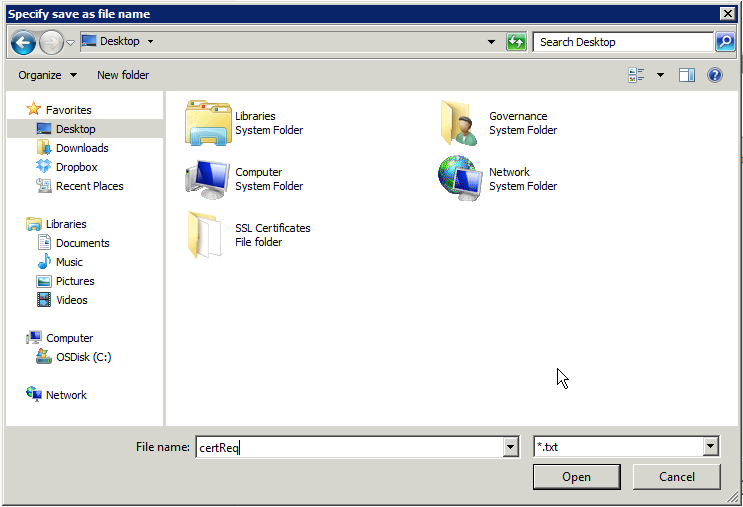 Give the file a name. I normally call it "certReq" (Certificate Request) just so I know what it is. If it already exists it will overwrite any existing file.Click on the Open button to select the file (it will be created if it does not already exist)Click on Finish to complete the certificate request process
Part 2 - Submitting and creating the SSL certificate
1. Open the certificate request file you created in Part 1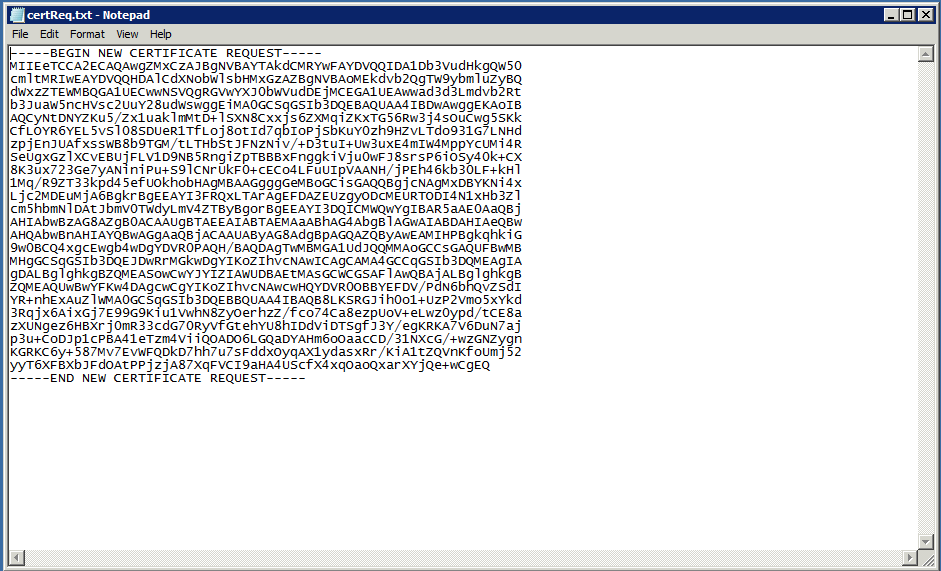 Select and copy the entire certificate (Ctrl + A or Cmd + A) and then Copy (Ctrl + C or Cmd + C) INCLUDING the -----BEGIN NEW CERTIFICATE REQUEST------ (and end) parts.2. Visit www.trustico.co.uk
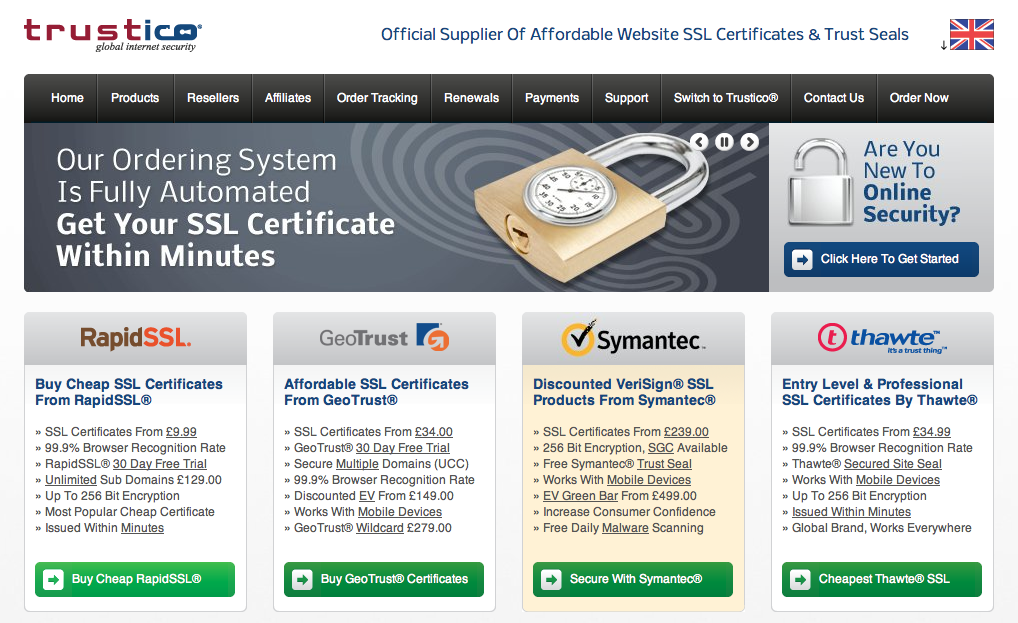 Click on the Buy Cheap RapidSSL green button2. Choose the type of SSL certificate you want to order (In this case I am ordered a normal Rapid SSL Certificate for £9.99. Click on the green Order Now button.
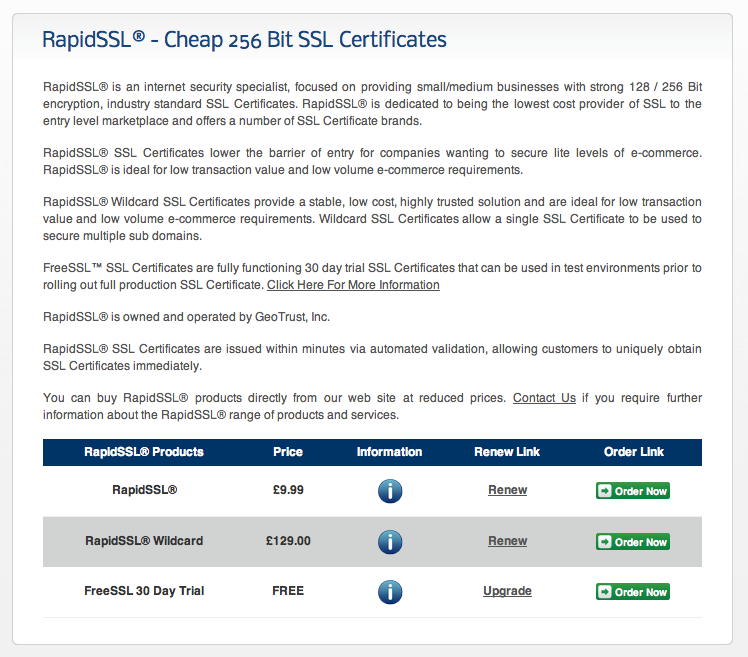 3. Choose the length of time you wish the certificate to be valid for. Unless you want to have to go through this process every 12 months (which gets very time-consuming when you have tens or hundreds to purchase), its best to go for the longest time-frame you can afford.
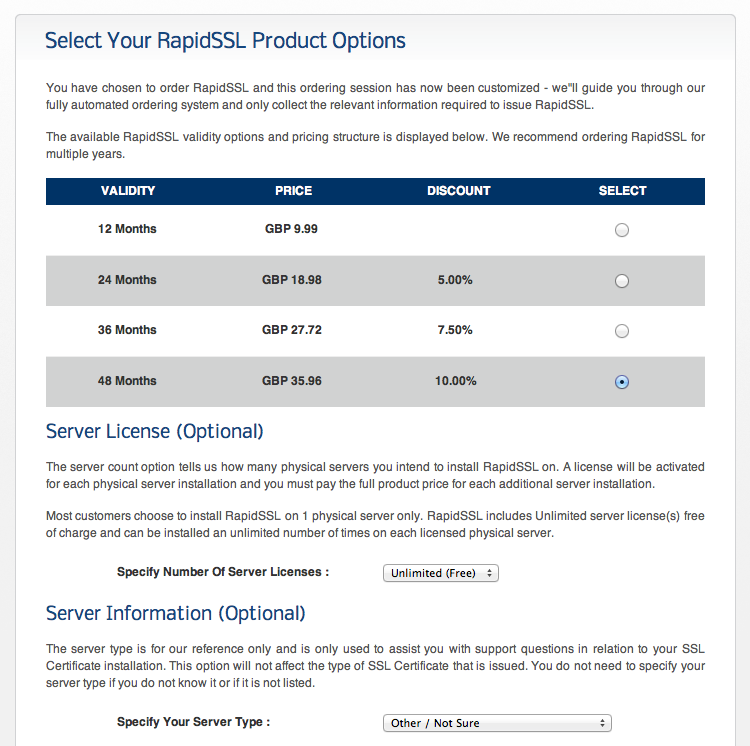 In this case, I am choosing 48 months, which is only £35.96 at the time of writing.Issuance Insurance: its your decision whether to keep this or not, and depends on what you need. I always turn Issuance Insurance off, in this case it will save £48 off the bill. If you think you are going to move servers, then keep this on unless you know how to export certificates from one server to another (thats another tutorial in the future).
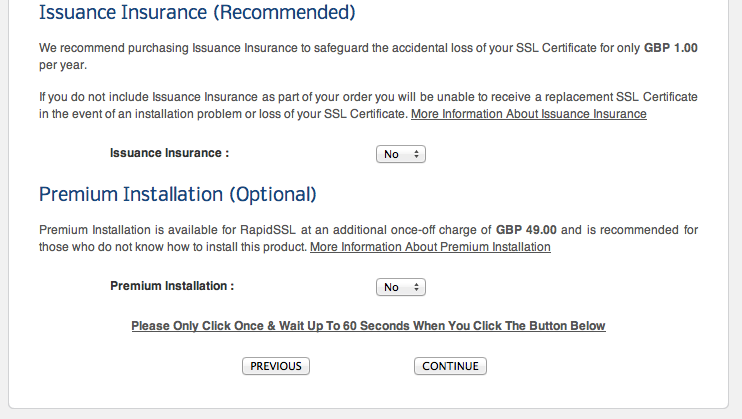 Click on Continue4. Enter all your contact information. Make sure you have access to the email address supplied at this stage otherwise you wont get the certificate at the end. (I have not entered all my details in the screen-shot below yet)
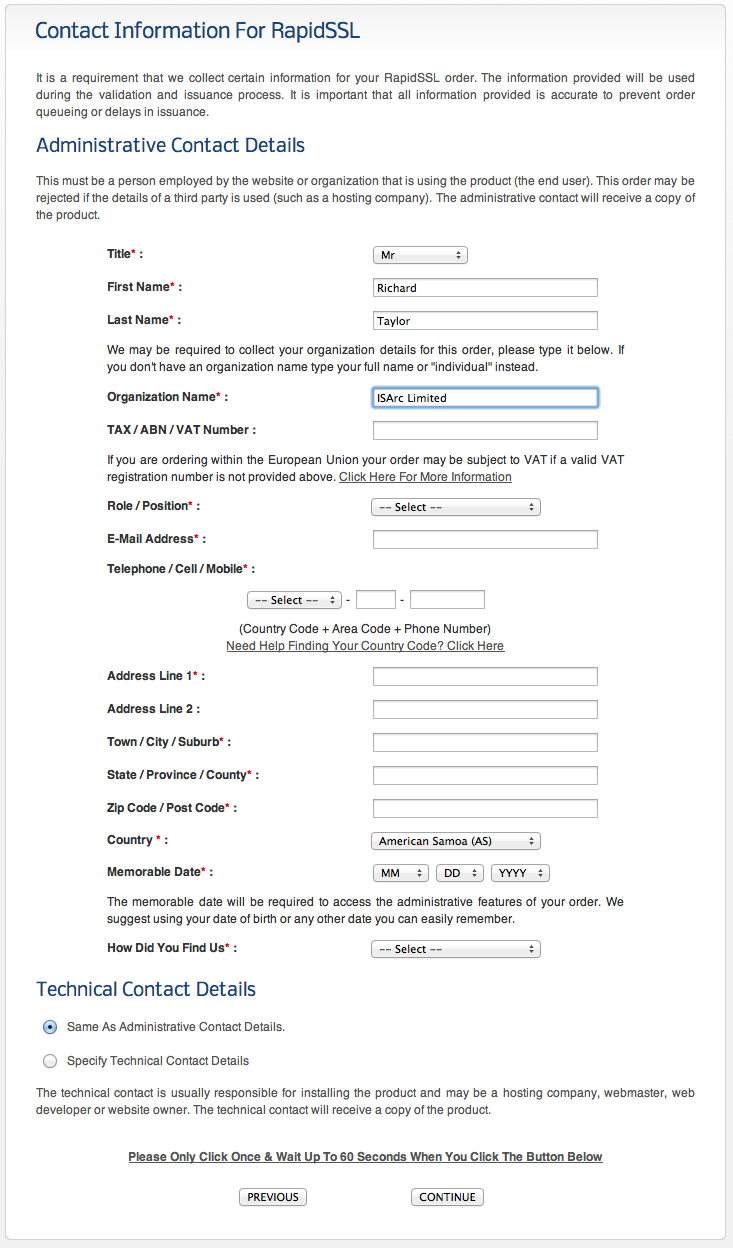 Click on Continue5. Click on Submit newly generated certificate signing request (I don't know why they think every word needs a capital letter, but anyway)Paste in your certificate that you copied in Step 1
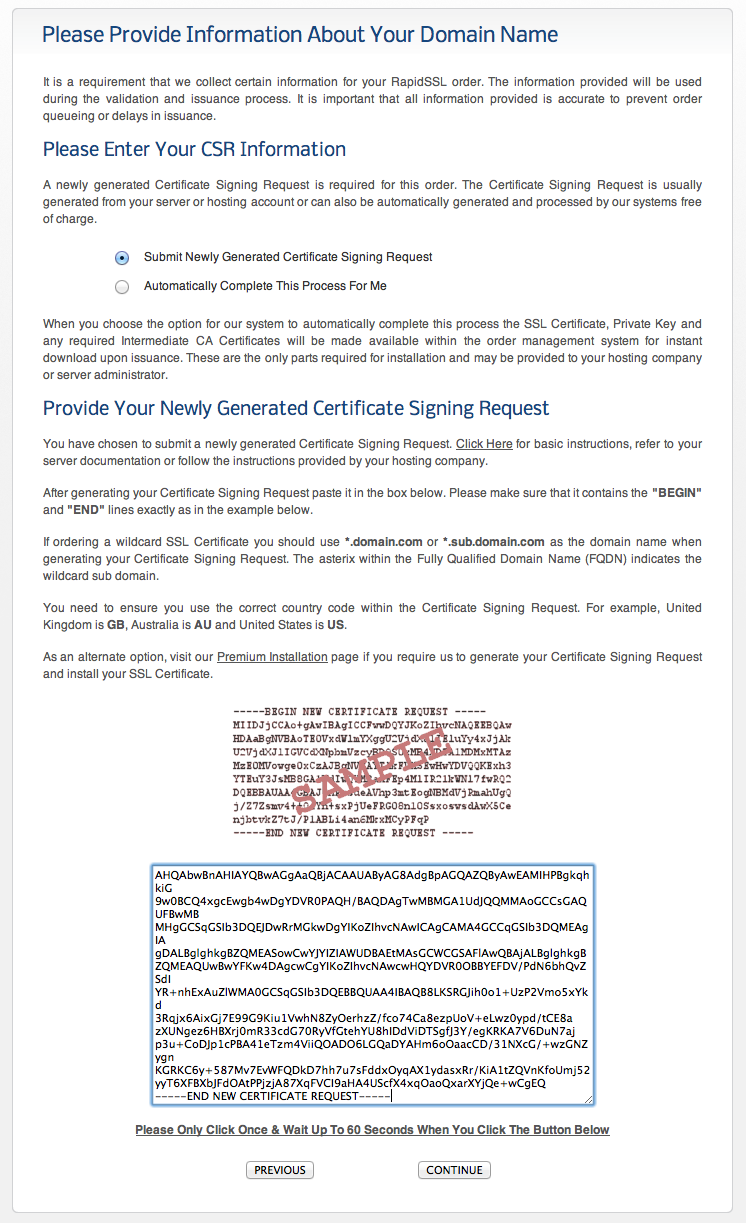 Click on Continue6. You are asked to verify the information. Click on Continue
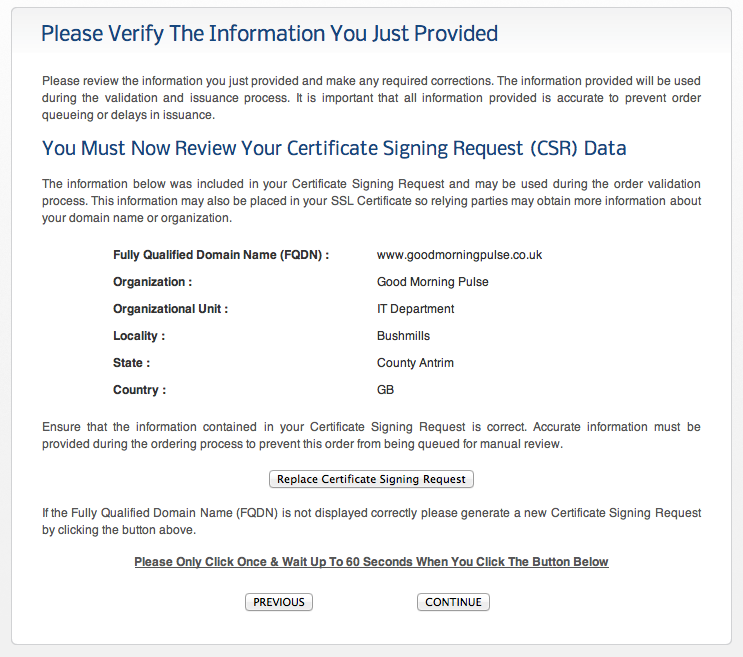 7. Next you have to confirm that you own the domain name by receiving an email at the domain. If you don't have a mail server set up, the easiest way to do this is to simply set up a mail forwarder to your own email address (very easy and free if you registered your domain with www.123-reg.co.uk )Choose the email address to send the approver email to, and click on Continue
 8. Read the subscriber agreement (has anyone ever read these?) Click on Continue
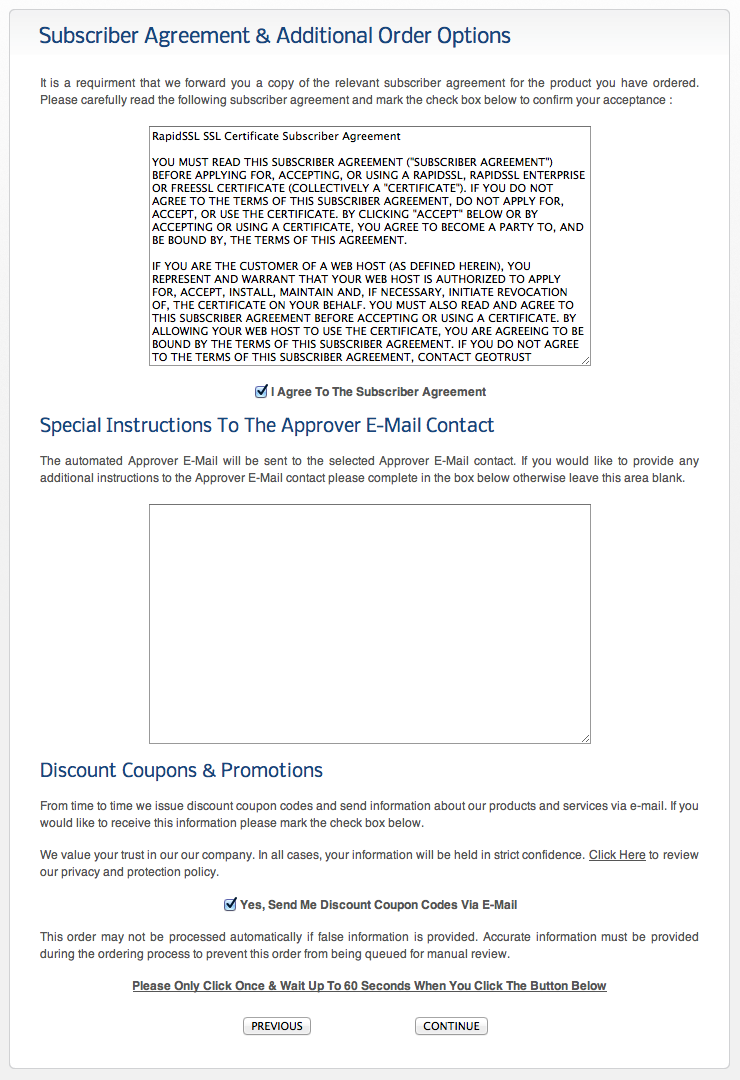 9. The confirmation details of what you are ordering is shown. Scroll down and click on Continue10. Pay for the certificate. I always use PayPal, which makes the certificate issuing process very fast indeed. No matter how you pay, it always says thanks for your credit card payment.
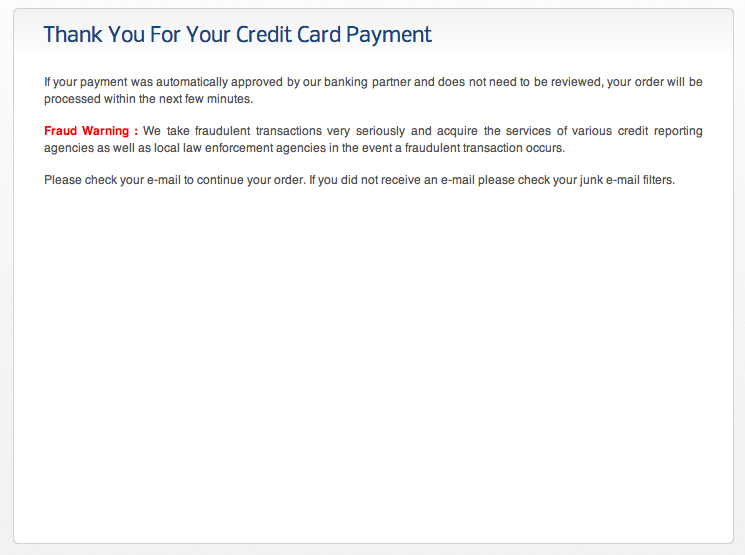 Thats the online (web) part done for now.11. Check your email (or the email address you choose at step 7 above if it doesnt forward to your own email address). You will have an email from sslorders@geotrust.com that asks you to visit a URL and Approve the certificate. Click on the link and click I APPROVE12. Go get a cup of tea, coffee or coke, check your email, play Minecraft or whatever takes your fancy. It takes about 10 minutes for your certificate to be created and it is then emailed to you.
Part 3 - Installing the certificate on the server
1. You should have an email from TrustICO (in this example it took 12 minutes to get to me) with the subject RapidSSL Fulfillment E-Mail [certificate name]Scroll down the email until you get to the ----BEGIN CERTIFICATE----- part. I have (obviously) hashed out my certificate for security reasons.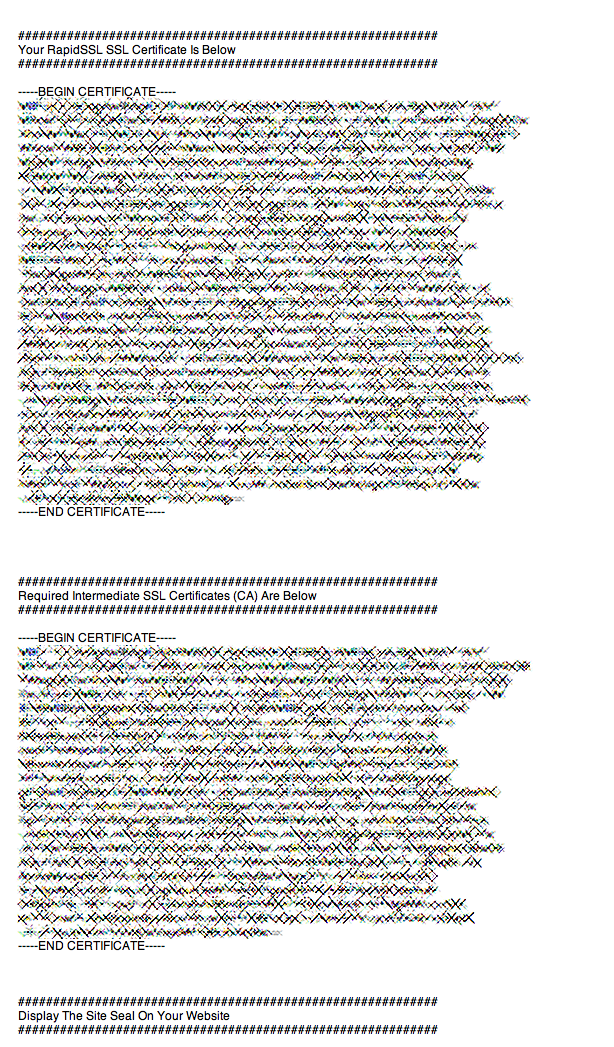 Select the whole certificate (including the begin and end lines) and Copy it to the clipboard (Ctrl + C or Cmd+C).Go back to the server (or if you are already on it, get to the desktop)2. On the server, Open Notepad3. Paste in the certificate
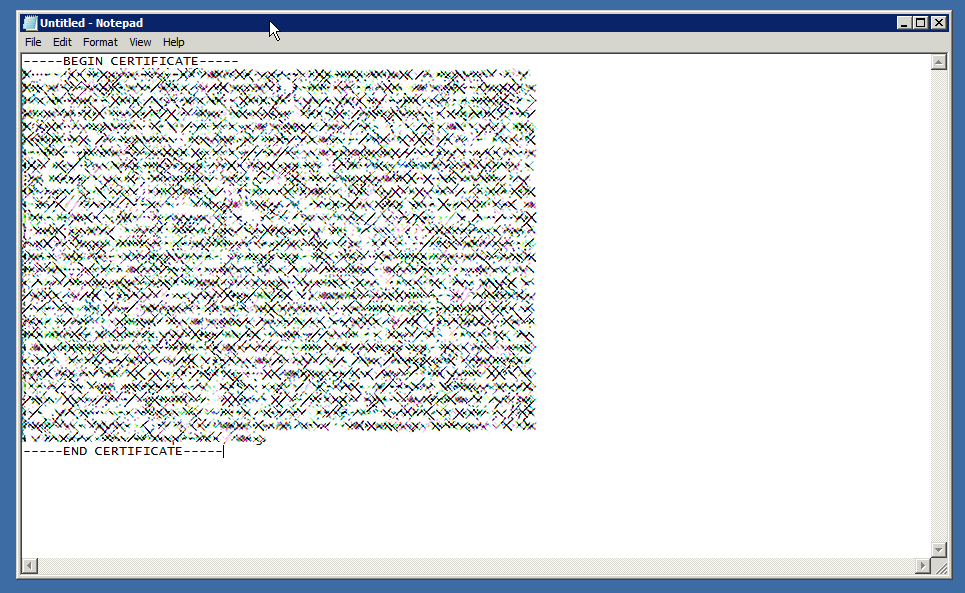 4. Click on File, Save As and choose the Desktop again (or if like me you have a lot of certificates, create a folder to put them all in)Give the certificate a name you will remember (I always put the years in so that I can distinguish between different years worth of certificates).IMPORTANT - there MUST be the extension .cer at the end.IMPORTANT - change the "Save As Type" to All Files (if you forget, it will add a .txt at the end of the file name, which you then have to remove to make it work)
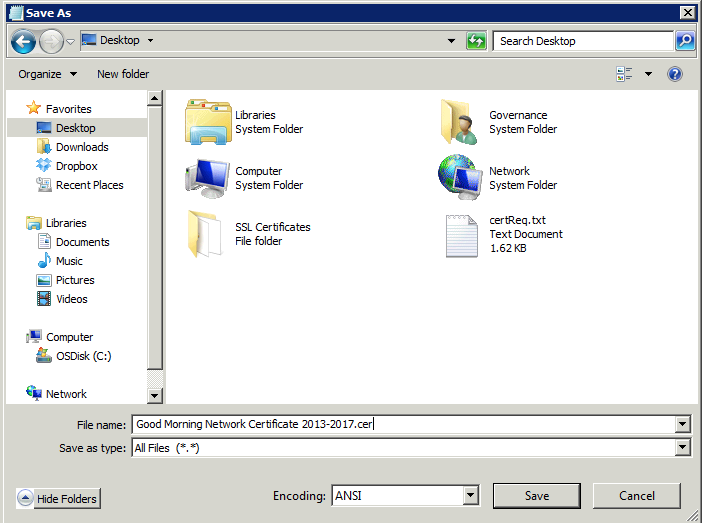 Click on Save5. You should now see a certificate on your desktop (or the folder where you saved it)
 6. Open IIS and go to the Server Certificates item 7. Click on Complete Certificate Request on the right hand side8. Choose your certificate for the File Name boxIMPORTANT - Friendly Name - if you ordered a wildcard certificate it is REALLY IMPORTANT that you put the common name of the certificate as the friendly name (e.g. *.goodmorningpulse.co.uk)In this case, as it was a single certificate, not a wildcard its good to give it a name so that you know which is which on the list.
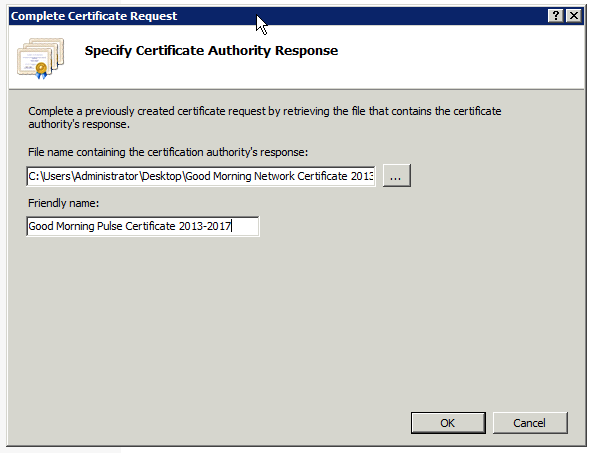 Click on OKIIS Parses the request, and if successful (which it always should be if you have created the certificate correctly) then it will add the certificate to your list.
Part 4 - Binding the certificate to the website
So you have your certificate on the server, and you now need to tell your website to use it.1. In IIS, expand the Sites item on the left hand side2. Right-click on the site you wish to use the SSL certificate for, and click on Edit Bindings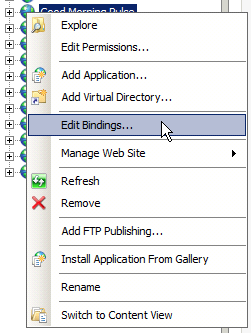 3. The site bindings are displayed. Click on Add4. Change the type to https and then Choose your new certificate
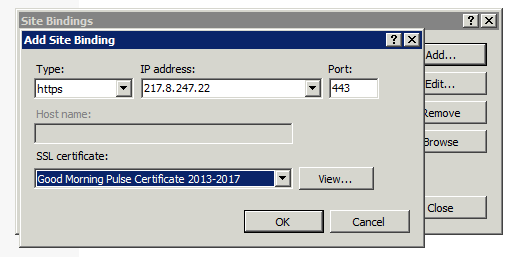 Click on OK and then Click on Close5. The site will now allow https connections! Its that simple!